
How to Pack Your Bike for Bikepacking

This is second in a series of essays by Taylor A Ritz on her cross-country bike ride with her dog, Dobby.
In my previous post, I introduced the Northern Tier Adventure Cycling Route that traverses from Bar Harbor, Maine to Anacortes, Washington. In this post, we will discuss what gear I brought with me on the 3200-mile bicycle trip.
Bikepacking vs. Bicycle Touring
Although I call this trip a “bikepack” it was really more of a bicycle tour. What’s the difference? In general, bicycle touring takes place on routes that traverse paved roads, while bikepacking is usually a more off-road experience. Most people who take part in bicycle touring use 4 panniers, one strapped to either side of each wheel, to store their gear. I, however, elected to outfit my Surly Ogre in a “bikepacking” setup, which utilizes bicycle bags in a more streamlined capacity. This limited the amount of space I had to carry gear but made for a less cumbersome and more maneuverable bike.
Bags
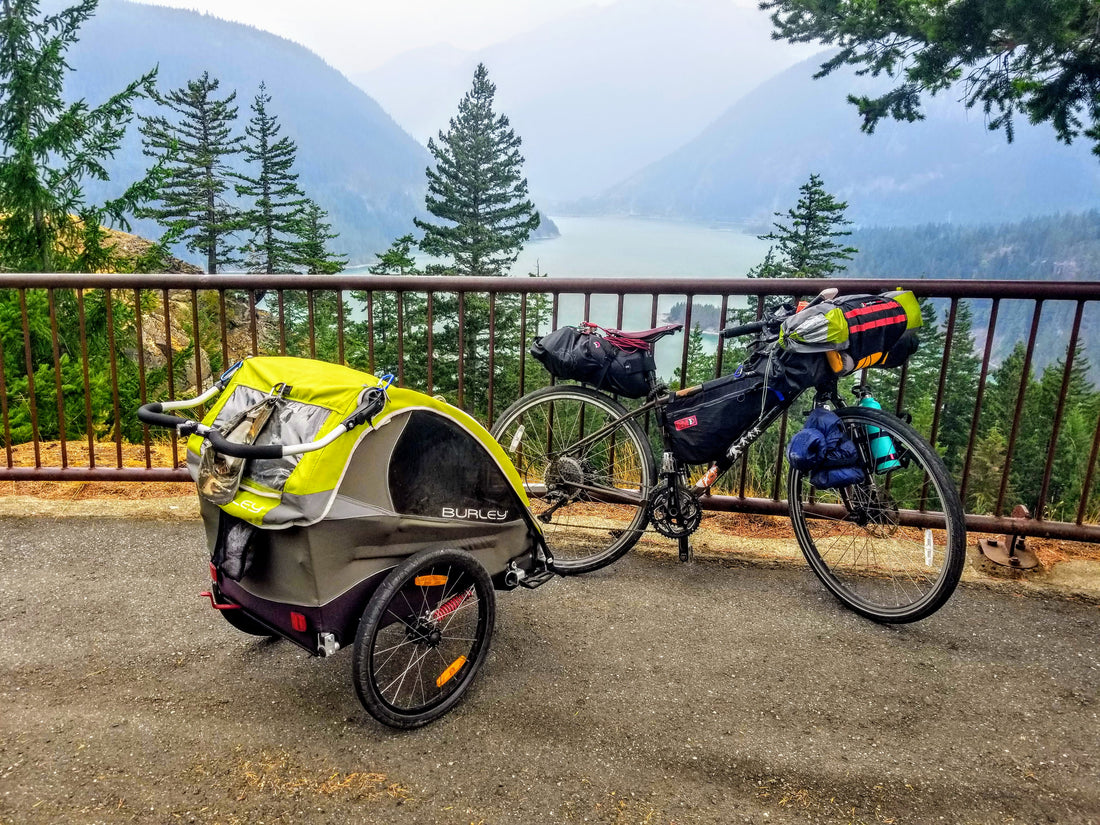
I had a frame bag, top tube, seat bag, and handlebar bag by Revelate Designs. The handlebars held 2 feed bags and on the front forks I had 2 Salsa Anything Cages.
On the bike
Even with such limited bag space, I still had to fit everything I needed on my bike. I had a little wiggle room since I brought Dobby with me in a trailer, but we’ll talk about his gear in another post. Here’s how I packed out my bike.
Seat bag
My seat bag sat underneath my bicycle seat. Since the bag barely fit between my seat and the wheel, I had to make sure it wasn’t too heavy or it would rub on the tire. To protect the bag I put a piece of duct tape on the underside. In my seat bag was all my camp kitchen items and food. I had a few camp meals, stove, fuel, pot, utensil, and water filter.
Handlebar bag
Inside the handlebar bag were my camp clothes, jacket, rain gear, and towel. Attached to the outside were my tent and sleeping pad.
Frame bag
Inside my frame bag was my camelback water bladder as well as a few other odds and ends. The hose for my camelback I wrapped around my handlebars so I could access it easily while riding.
Dashboard
What I called the “dashboard” of my bike included the top tube bag, GPS mount, and feed bags.
The top tube held my phone, riding gloves, and headphones. The feed bags held whatever snacks were getting me through the day (usually trail mix and a LOT of chocolate), and my GPS mount held a Garmin bicycle GPS. My Garmin had the Northern Tier route downloaded onto it, and I had paper maps of the route as well.
Editor's note: We think our featherweight pouch is perfect mini-wallet for bikepacking. It's a slim, weatherproof pocket organizer that is ultralight-weight and will keep your stuff safe, handy and dry in any kind of riding conditions.
Front Forks
On the front forks I had 2 Salsa Anything Cages. These mounts allow you to strap odd-shaped items to your front forks with the straps the cages come with. On one fork I had all of my repair tools and spare parts. I carried a multitool specially geared for bikes, extra tubes (for my bike and the trailer), 3 tire levers, and a patch kit. (Check out this article on packing your cycling kit essentials in our Tour De Fierce Ultralight Cycling Wallet.) These items had their fair share of use as each trailer tire went flat over the 300-mile journey. Twice. On the other fork I stored emergency water in a Hydroflask.
Note: because I had Dobby in a trailer, I was able to store my sleeping bag in it instead of on my bike.
Being Self-Sufficient
In summary, what I brought with me on a cross-country bicycle tour was everything I needed to be self-sufficient along the way. I was able to bike and camp each day on my own. As long as I had access to restock food along the way, I could travel independently.
Photos courtesy Taylor A Ritz Instagram: @wilderritz
Sign up for our newsletter
Stay connected with Fierce Hazel and sign up for our newsletter to be the first to know of new posts, news & promotions.